Robot vacuums have come a long way in the past few years, adding advanced features like mapping, voice control, and smart scheduling. But most of these features depend on a Wi-Fi connection to work.
That can cause issues because, as we all know, Wi-Fi networks aren’t always that reliable. And while there are steps you can take to improve the Wi-Fi connection in your home, often the easiest solution is to reconnect your Shark robot vacuum to Wi-Fi.
So whether you are changing your Wi-Fi network or your Shark keeps losing its Wi-Fi connection, this article will cover everything you need to know.
It also includes steps to troubleshoot the most common connection issues that you may run into so you can get back to enjoying clean floors.
How To Reconnect Shark Robot To Wi-Fi
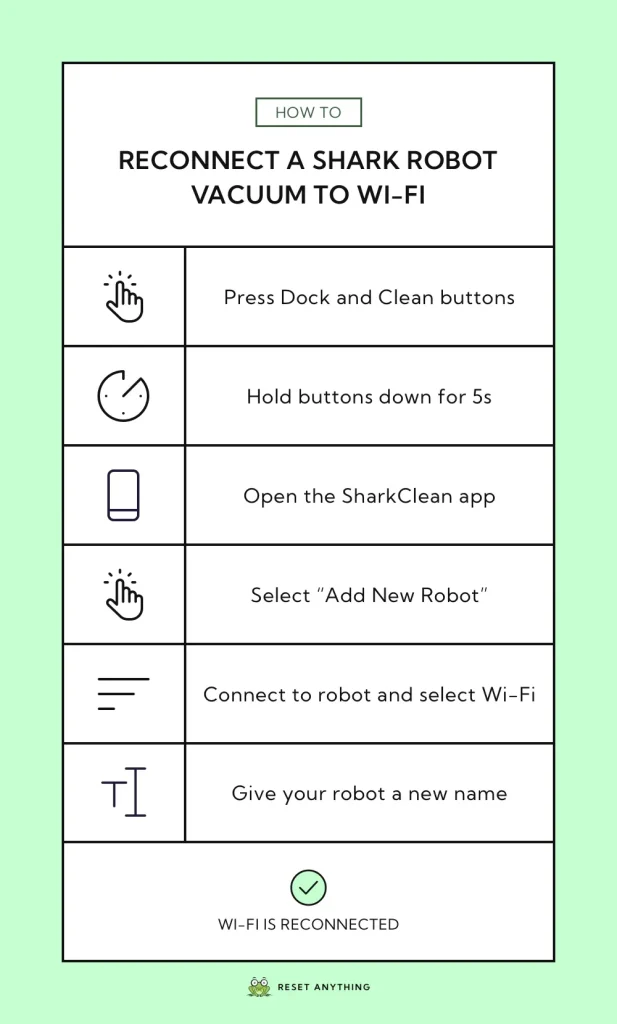
Press and hold the Dock and Clean buttons for about 5 seconds until the Wi-Fi light on the robot begins to blink. Open the SharkClean app on your phone and select “Add New Robot”. Connect to your robot, select your Wi-Fi network, and give it a new name.
This process has a very high success rate and should work as long as there isn’t an underlying issue in your Wi-Fi network or robot vacuum.
The downside is that you have to change the robot’s name when you do this, but it does let you keep your existing map. I’d much rather change the vacuum’s name than have to recreate my map all over again!
Keep in mind that if you have a Shark Ion robot vacuum, the button combination might be slightly different. You will want to press the Dock and Max buttons instead to get the robot ready to reconnect to Wi-Fi.
What To Do If Your Shark Robot Still Isn’t Reconnecting
In a perfect world, the process above would work 100% of the time. Unfortunately, we are not all that lucky.
Follow these steps to reset your robot’s Wi-Fi connection:
- Reboot your Wi-Fi router by unplugging the power cord and waiting 60 seconds before plugging back in.
- Check to make sure the Wi-Fi is working using your phone or a tablet.
- Use the power switch on the robot to turn it off, then wait 10 seconds before turning it back on.
- Reboot your phone by powering it off, wait 2 minutes, and then power it back on.
- Connect to your Wi-Fi network again.
- Open the SharkClean app and connect to Wi-Fi or select “Add a new robot” and connect that way. (Make sure to give the robot a different name, though.)
What this process does is gradually remove most of the issues that could be stopping your robot from connecting to the Wi-Fi network.
And although it is time consuming, it can be a pretty effective way of resetting the Wi-Fi if you are having trouble getting your robot to connect.
Troubleshooting Tips
Sometimes you only need to reconnect your Shark robot vacuum to Wi-Fi once, for example if you’ve recently changed routers, service providers, or passwords.
But some people find that their robot vacuums keep losing their Wi-Fi connection over and over again. In these cases, there are a few steps that you can take to try to fix the underlying issue and determine if there could be a problem with your Shark robot.
I’ve arranged these steps from “easiest” to “most time-consuming”, so I recommend going through them in order until you find something that works.
If you go through these troubleshooting steps and none of them work, then it might be time to contact Shark’s customer support team. It’s not unusual for Wi-Fi to be a little finicky, but you definitely should not have to reconnect your robot multiple times a week.
Put Your Phone On Top Of The Robot When Connecting To Wi-Fi
When you are reconnecting your robot to Wi-Fi, it can help to place your phone directly on top of the robot while setting it up in the app.
The rule of thumb here seems to be “the closer, the better.” The reason that this works is because it helps your app connect to the robot faster, lowering the chances that the app or Wi-Fi network will time out and interrupt the process.
So if you find that it is taking your robot more than 60-90 seconds to connect, try this step to see if it can speed things up.
Connect To Wi-Fi Using A Different Device
This one is going to sound a little strange, but it works.
If you typically use an iPhone to control your robot, try connecting it to Wi-Fi using another device, such as an iPad or Android phone.
Similarly, if you use an Android phone, try using an Android tablet, iPad, or iPhone to connect.
Some of the Wi-Fi connectivity issues that Shark robots experience seems to be caused by the app itself, so installing the app on a different device and following the same steps can help to resolve those issues.
This is especially helpful if you still can’t connect to Wi-Fi even after rebooting your router and phone, but it can also help when your Wi-Fi connection keeps dropping.
Move The Charging Dock
The location of the charging dock is really important and can affect the strength of the Wi-Fi signal that reaches your robot.
Most people place their charging docks in the kitchen or living areas, but I’ve noticed a potential problem with this. Since these are two rooms that tend to have a lot of other smart devices in them, such as TVs and appliances, interference can sometimes cause the robot to lose Wi-Fi connection.
If your robot is losing its Wi-Fi connection on a daily basis, there’s a good chance that it’s being caused by interference. Try moving the base station to another area in your house and follow the steps above to reconnect it.
The downside is that you will need to remap your home after moving the charging dock, since the robot uses the map to guide itself back to the dock. I recommend picking a room with the fewest devices possible and trying this step once.
If it works, then you’ve fixed your Wi-Fi problem! If it doesn’t, you can safely assume that interference isn’t the source of your issue.
Disable Additional Nodes In Your Mesh Network
Mesh networks create additional coverage throughout your home, but they can also wreak havoc on smart devices. Shark robot vacuums seem to encounter most problems for people who have mesh Wi-Fi networks set up in their home.
One quick way to check this is unplug any additional nodes you have set up throughout your house and use the base unit by itself. This reduces the amount of available connection points that could be confusing your robot and causing it to lose its connection.
After unplugging all mesh nodes except for the base unit, reconnect your robot to Wi-Fi using the steps above and test it out for a few days. You should quickly be able to tell if this is the source of your problem or not.
Shark Robot Vacuum Manuals
You can find a digital version of the manual for any of Shark’s robot vacuums from their online support center. This can be helpful to check any additional steps that may be required for your model, although the troubleshooting guide above should work for most Shark models.
Contacting Shark Support
We all want to avoid contacting customer service if we can avoid it, but if you’ve exhausted all of your other options, this is the next best step.
Many people who run into Wi-Fi issues have had success getting Shark to replace their unit, and most of the time that replacement unit works flawlessly.
Shark offers a warranty period of anywhere from 1 to 5 years for their robot vacuums, depending on the model you purchased.
You will need to call SharkNinja support in order to begin a warranty claim by calling 1-877-581-7375. It’s a good idea to register your product online first at registeryourshark.com to check your warranty status and make the process go faster.
If your curious what to expect, I wrote an article that goes into more detail on the SharkNinja warranty experience.