Keypads are a fantastic convenience feature that let you easily access your garage at any time, even if you don’t have the remote with you. It’s also a great way to let guests into your home without giving them a key.
But because garage keypads are stored outside in plain view, it’s a good idea to regularly reset your code. I recommend changing it every 6 months to make sure that no one is able to use an old code to get into your garage while you’re away.
To reset your LiftMaster keypad, locate the Learn button on your garage door opener. Press and hold the Learn button for 6 seconds or until the LED light turns off. Press the Learn button again and within 30 seconds enter the new 4-digit PIN code into the keypad and press Enter.
This process is relatively straightforward and doesn’t require you to know the code. That’s convenient because it’s fairly common to forget a garage door keypad code, especially if you aren’t using it very often or recently purchased a house.
In the rest of this article, I’ll go into more detail on the steps to reset your keypad and explain how to set up a temporary PIN code if you need to grant access to someone else.
Let’s get right to it!
How To Reset LiftMaster Keypad With Code
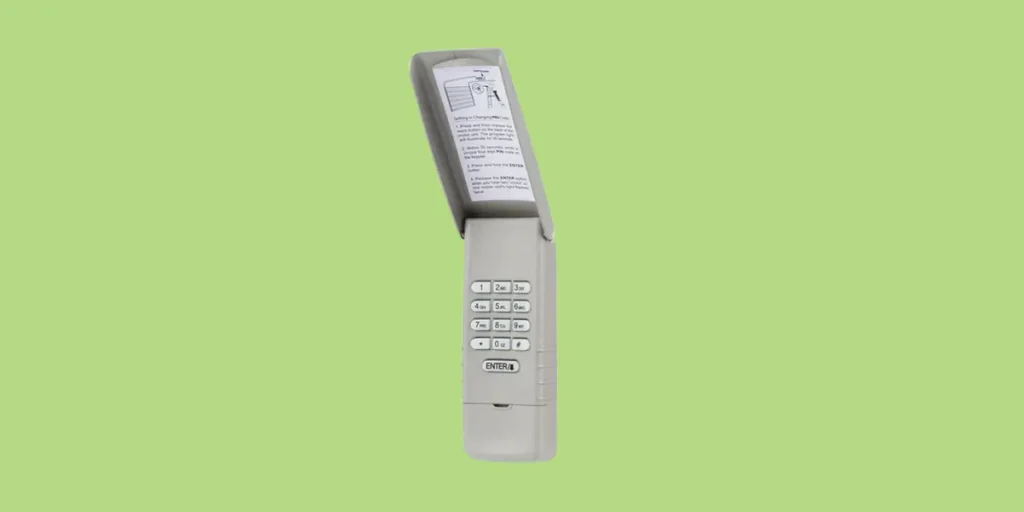
You can quickly reset an existing PIN code right from the keypad if you know the code. This is useful because it means you don’t have to worry about climbing a ladder to access your garage door opener.
To reset the keypad using an existing PIN code, follow these steps:
- Type in the PIN code that you’d like to change.
- Press and hold the pound (#) button until the light on your garage door opener blinks twice or you hear two clicks.
- Type in the new PIN code (it must be 4 digits) and then press Enter.
- Test the new code to make sure it’s working by entering the PIN and pressing the Enter button once.
How To Reset LiftMaster Keypad Without Code
It’s relatively easy to reset your LiftMaster keypad, even if you have forgotten the 4-digit PIN code.
You will first need to erase all codes from your garage door opener and then set a new PIN code. To do that, follow these steps:
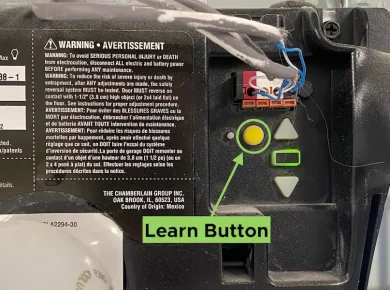
- Use a ladder to reach your garage door opener and locate the large yellow Learn button located on the back.
- Press and hold the Learn button for about 6 seconds or until the LED light to the left of the button turns off.
- Press the Learn button one more time to enter programming mode. The LED light should turn back on and you will have 30 seconds to enter a new code.
- Within 30 seconds, go back to your garage keypad and enter the four digit PIN code that you would like to use going forward.
- Press and hold the Enter button on the keypad and wait until you see the light on the garage door opener blink or hear two clicks.
That’s all there is to it! Keep in mind that you will also need to reprogram your LiftMaster garage door opener remote as well once you are done.
For this reason, it’s best to write down the new PIN code and keep it somewhere secure. That way if you do lose the code again, you can find it and reset it more easily next time.
Set Temporary Garage Code for LiftMaster
If you don’t want to reset your primary PIN code but want to give someone access to your garage for a certain amount of time, you can set a temporary code.
To set a temporary code, follow these steps:
- Enter your programmed PIN code.
- Press and hold down the asterisk (*) button until the light on your garage door opener blinks three times.
- Type in the 4-digit temporary PIN code that you’d like to create and press the Enter button to confirm. The light on your garage door opener should blink 4 times.
- Decide if you want the code to work for a certain number of hours (the maximum is about 10 days) or a certain number of openings.
- To set the number of hours, enter any number between 1 and 255 and then press the asterisk (*) button. The light should blink one time.
- To set the number of openings, enter any number between 1 and 255 and then press the pound (#) button. The light should blink one time.
Being able to set the number of openings is very convenient, because it gives you a way of giving someone access to your garage door once.
It is also not time restricted, so you can program a temporary PIN and then have it handy in case you ever need to give it to someone while you’re away on vacation or at work—even if it’s 6 months later.
How To Test A Temporary PIN
You can always test a temporary PIN code to make sure that it’s working by typing in the code and pressing the Enter button.
Keep in mind that if you selected a specific number of openings when creating the temporary code, this test will use up one of those openings.
So in my experience it’s best to add an extra opening so that you can test your code and make sure it’s working and avoid any surprises.