Blinking lights, beeps, algae and more—I’ve experienced it all over the past several years with a Ninja coffee maker. To help save you time, I’ve pulled together all of the most common issues along with tips on how to troubleshoot them.
This article breaks down issues into four categories:
- Beeping and blinking: What to do if your coffee maker starts beeping or one or more lights on the panel are blinking.
- Cleaning: How to descale and clean your Ninja coffee maker and what to do if you notice green algae growing somewhere.
- Buttons not working: What to do if specific buttons (or all buttons) stop working.
- Performance: What to do if your coffee isn’t hot enough, if there are grounds in your coffee, or if coffee is overflowing while brewing.
The good news is that most of the issues I’ve encountered with Ninja coffee makers over the years can be solved relatively easily. And most issues come down to properly cleaning and descaling your machine.
So be sure to bookmark this page in order to keep these tips easily accessible.
Beeping and blinking
Ninja Coffee Maker Stops Brewing And Beeps 3 Times
This typically means that your Ninja has run out of water. However, if your reservoir still has plenty of water left to complete the cycle, it may mean that the brew nozzle is clogged.
What can happen over time is that calcium deposits build up and block the flow of water in the machine. This can trick it into thinking that it’s run out of water even if the reservoir is full.
Your best option is to run a cleaning cycle and descale the entire coffee maker. To do that, just follow these steps:
- Empty your reservoir and fill it to the Travel Mug line (about 16 oz.) with white vinegar. (You can also use a descaling solution or citrus acid powder.)
- Fill the rest of the reservoir with water, up to the Max Fill line.
- Put the carafe on the hot plate, set it to Full Carafe, and press the Clean button. This process will brew several times over the next hour.
- Dump the vinegar solution and then run 1-2 full reservoirs of water through the machine to flush out the vinegar or descaling solution.
After you’ve descaled the machine, try brewing again and see if the issue is resolved.
The Clean Light Is Blinking
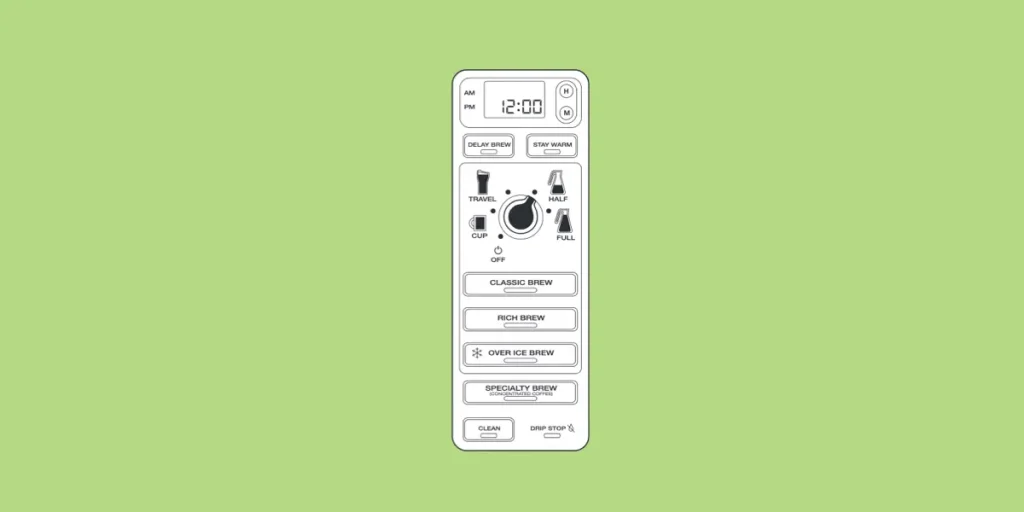
Any time the Clean light is on, whether solid or blinking, it means that it’s time to descale your coffee maker.
A solid Clean button light indicates a normal cleaning cycle is needed, whereas a blinking Clean light means that the coffee maker has detected a critical build up of calcium.
If the light is blinking, you may need to run more than one cleaning cycle with white vinegar or a descaling solution in order to clear the blockage.
This can happen if you haven’t cleaned your machine in a while or if the water in your area is very high in calcium (hard water). The best way to avoid this issue in the future is to descale the machine more regularly, possibly as often as once a month.
Cleaning
The Water Reservoir Is Green (Algae)
If you’ve just glanced into your water reservoir and noticed a green tint to it, that green color is algae growing in the reservoir. But don’t worry—it’s not toxic and it won’t make you sick!
However, it’s a good sign that it’s time to thoroughly clean your machine.
Remove the reservoir from your Ninja and soak it in warm, soapy water for about 10-15 minutes. Then scrub it down thoroughly, making sure to get the edges and under the lid. (I find that a Scrub Daddy works well for this.)
These multi-colored sponges make it easy to clean all the nooks and crannies of your Ninja coffee maker without scratching. Always remember which sponge is for the coffee maker thanks to the different colors.
After you’ve cleaned out the reservoir, add 16 oz. of white vinegar (or the recommended amount of your descaling solution) and fill the rest of it with clean water. Then press the Clean button to run a descaling cycle.
The white vinegar or descaling solution will help to kill and wash out any remaining algae that may be trying to grow in your machine.
Unfortunately, sometimes algae can grow inside the spring mechanism at the bottom of the reservoir. This is going to be a bit trickier to clean.
Some people have luck cleaning it by pushing a straw or pipe cleaner through the hole in the top. If you have a water pick handy, this can also do the trick. Turn it on and spray the mechanism from the bottom, using the water pick to dislodge and rinse out any algae that’s growing there.
You can also order a replacement reservoir if it’s too far gone or those cleaning methods don’t work.
The Water Reservoir Has Mold
A study by the National Science Foundation discovered that about 15% of American households had mold present in their coffee maker reservoir.
That’s a relatively small percentage, but it’s a good sign to take cleaning your Ninja a top priority when it comes to regular household chores. No one likes drinking moldy coffee, after all.
The steps to clean it are the same as those for algae growth and calcium deposits: run a cleaning cycle through your coffee maker. Ideally, if you suspect mold or just want to err on the side of caution, you can also hand wash the reservoir, brew basket, and carafe in warm soapy water.
Doing so every 2-4 weeks will ensure that mold doesn’t have a chance to get a foothold and will ensure that your coffee maker keeps running smoothly.
There is usually a simple way to fix any malfunctioning buttons or displays on your Ninja, either by cleaning, adjusting, or resetting the machine. Keep reading for specific tips depending on which part of the control panel you’re having issues with.
Brew Button Not Working
If the brew button doesn’t seem to be working, there are a few things you can try:
- Make sure that the brew basket is pushed all the way in and that the drip stop is set to open.
- Fill the reservoir up to the Max Fill line.
- If that doesn’t help, unplug the machine for 5 minutes, then plug it back in and try again.
This is a fairly rare issue and usually means that the machine will either need to be serviced or replaced. If the steps above don’t help, it’s best to reach out to Ninja support at helpfulninja@sharkninja.com.
Keep in mind that all Ninja coffee makers come with a 1 year warranty that should cover issues with any of the buttons, so if you’ve purchased your machine recently you may be able to get it replaced under the warranty.
Stay Warm Button Not Working
By default, the warming plate will stay on for 2 hours after you start a brew. It’s possible to go into the settings and extend this time up to a maximum of 4 hours.
If the button doesn’t seem to be working or it’s not staying warm long enough, try these steps to reset it:
- Press and hold the Stay Warm button until the clock begins to flash.
- Quickly press the hour (H) or minute (M) buttons to adjust the length that it will keep warm, up to a maximum of 4 hours. For example, to keep it warm as long as possible, set the hour to 4 and the minutes to 00.
- Confirm your change by pressing the Stay Warm button again.
- Run a brew cycle to test and make sure that this has fixed your issue.
Keep in mind that the Stay Warm button only works on either a half pot or full pot settings. If you have it set to brew on smaller or single-serve settings, you will need to manually turn on the warming plate.
Here’s how to do that:
- Brew your coffee like you normally would on your preferred setting.
- Once the coffee has finished brewing, change your setting to half pot or full pot.
- Press the Stay Warm button once and the warming plate will turn on.
This is great if you like using the carafe but don’t want to brew a lot of coffee, and you want the heating plate to keep your coffee warm.
Ninja Coffee Maker Clock Display Not Working
Issues with the clock display can usually be fixed by resetting your Ninja coffee maker. Simply unplug the machine from the outlet, wait at least 5 minutes, and then plug it back in.
If the clock display is still malfunctioning, it is most likely due to an issue with the control panel and the unit may need to be replaced.
You can contact Ninja at helpfulninja@sharkninja.com if you purchased your coffee maker in the last year. They may ask you to perform additional troubleshooting steps before agreeing to repair or replace the unit.
Performance And Brewing Issues
Coffee Maker Not Making Full Cup
There are two common reasons why your Ninja may not be brewing as much as it should be.
Reason #1: You recently removed the water reservoir to refill it. I’ve found that taking the reservoir off to refill it will sometimes result in the next brew being slightly smaller than it should be.
To avoid that happening, I recommend refilling the reservoir without taking it off the coffee maker, using either a cup or water pitcher.
Reason #2: Calcium deposits have started to build in your machine, causing less water to get dispensed into the filter basket (and into your waiting cup).
The fix is to run a cleaning cycle with either white vinegar or another descaling solution so that any hard calcium deposits get broken up and flushed out.
As a bonus, descaling your machine might make your coffee taste better too.
Coffee Is Overflowing The Grounds Basket
In my experience, and based on Ninja’s advice, your grounds basket might overflow if the coffee that you’re using is too finely ground.
The type of grind you use for a Ninja coffee pot should be somewhere around medium ground. If you find that the basket is overflowing, try switching to a larger grind level.
Coffee that has been ground too finely takes more time for water to seep through, and the Ninja may brew faster than it can drain. So switching to a courser grind can help with overflowing issues.
You should also check to make sure that the drip stop is opened all the way.
Coffee Grounds In The Coffee
Coffee grounds ending up in your cup can happen for two reasons: You’re using too finely ground coffee, or the brew basket overflowed.
Since the main reason for a brew basket to overflow is using too finely ground coffee, the solution to both issues is to switch to a medium or larger grind on your coffee and see if that fixes the issue.
You may also try switching the types of filters you’re using. I noticed that when I use the permanent filter that Ninja provides, on my preferred grind setting, a few coffee grounds and some sediment end up in my drink at the end of the brew.
Switching to paper filters completely solved this issue for me.
Ninja Coffee Maker Not Hot Enough

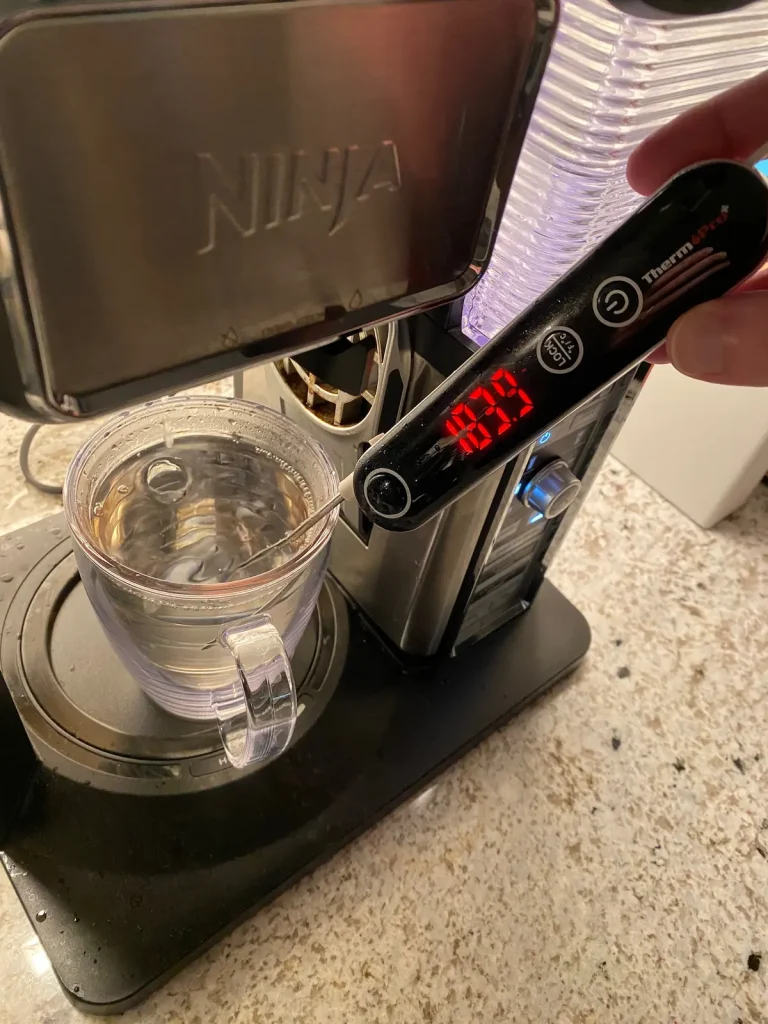
After you turn on your Ninja coffee maker, it takes a full three minutes to heat up the water in the internal reservoir. In my testing, a Classic brew will heat the water in the reservoir to 177ºF (80.5ºC) and a Rich brew will heat it to roughly 184ºF (84.4ºC).
So if you want a hotter cup of coffee, choose the slower Rich brew option.
Unfortunately, there is no way to manually adjust the temperature of the coffee. Ninja also recommends that for the hottest possible coffee, you should leave the coffee maker plugged in and powered on at all times so that it keeps the water hot whenever you’re ready to brew.
You can also use an instant read thermometer like the ThermoPro to check that there isn’t an issue with the heating element in your coffee maker.
What You Need To Know
Most of the issues you’re likely to run into with a Ninja coffee maker can be fixed by regularly cleaning your machine. I suggest cleaning at least once a month, or twice a month if you live in an area with hard water (high calcium levels).
It’s also a good idea to use medium ground coffee, as anything finer may cause the filter basket to overflow.
Overall, my experience with Ninja coffee makers over the years has been excellent. It gets used daily and I have yet to run into an issue that required anything more than a simple reset or a thorough cleaning.


