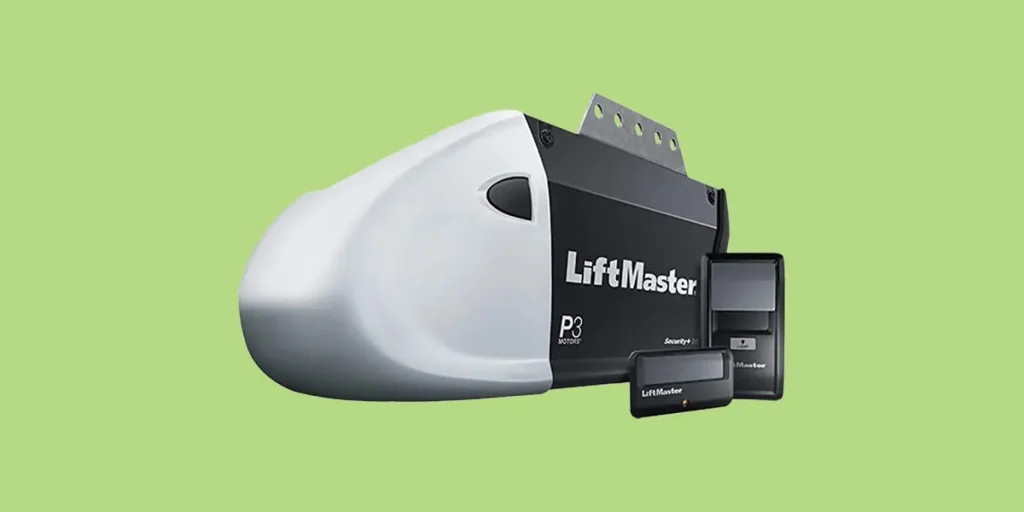
Most LiftMaster garage door openers are designed to last at least 15 years under normal use. But that doesn’t mean that they are completely without problems.
It’s perfectly normal to run into the occasional issue with the door or the remote, especially if you’ve recently installed the garage door opener. But the last thing you want to do is waste an entire afternoon chasing down solutions, so I’ve compiled all of the main troubleshooting tips in one place.
But the last thing you want to do is waste an entire afternoon chasing down solutions, so I’ve compiled all of the main troubleshooting tips in one place.
There are six common issues that people encounter with LiftMaster garage door openers. These are:
- LiftMaster garage door won’t close
- LiftMaster garage door won’t stay closed
- LiftMaster garage door won’t open
- LiftMaster remote won’t program
- LiftMaster MyQ won’t connect to WiFi
- LiftMaster light won’t turn off
In this article, I’ll cover all of these commons problems and share detailed steps to troubleshoot them so that you can hopefully avoid a service appointment. I’ll also provide information about how to contact LiftMaster to get support if you are still having problems.
Let’s get right to it!
LiftMaster Garage Door Won’t Close
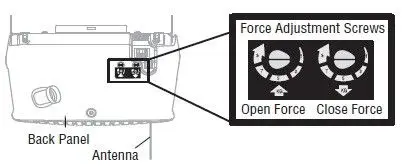
The most common reason for a garage door that won’t close is a problem with the force controls.
These are small screws on the garage door opener that determine how much force it will close the door with. If the door won’t close, this may be set too low.
You’ll need to grab a flat head screwdriver and a ladder to fix this.
- Locate the force control screws, which are typically on the back of the garage door opener.
- Insert the screwdriver into the screw labelled Close Force and turn it slightly higher, following the diagram that is with it.
- Most garage doors can be closed at around a setting of 3-4.
- Try closing the garage door again to see if it works.
Hopefully, that should fix the issue. If not, you can keep slowly increasing the close force until the motor is providing enough force to push the door down.
LiftMaster Garage Door Won’t Stay Closed
Sometimes, your LiftMaster garage door will close but then will open again a moment or two later—as if it has a mind of its own.
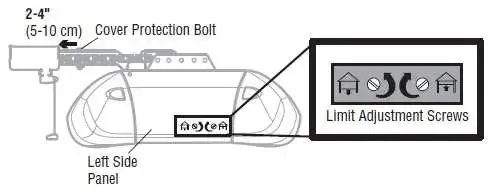
This issue is usually caused because the door travel setting is set too low when going down. When the door hits the ground, the garage door opener thinks that it’s actually hitting an obstruction and immediately raises the door again.
That’s a useful safety feature, but not something that you want happening every single time you close the door.
To fix this, you will need to grab a flat head screwdriver and a ladder.
- Locate the door travel screws located on the side of the garage door opener.
- The icon with the garage door and an arrow point down control the travel when lowering.
- Insert the flat head screwdriver into the screws and turn it clockwise, about one full rotation.
- Activate the garage door to test if it will lower itself all the way down and stay down.
- Test the safety reversal system by placing a piece of wood or any solid object that’s at least 1.5″ tall and lowing the door on it. If the safety reversal system is working, the garage door should raise back up.
- If the safety reversal system doesn’t work, you will need to lower the door travel about half a turn and test it again.
LiftMaster Garage Door Won’t Open

If your garage door won’t open, it’s probably because the opener has the force setting too low to lift up the door. This is especially common in insulated doors or doors with windows that might be heavier.
To fix this, you will need to adjust the opening force screw on the garage door opener itself.
Grab a flat head screwdriver and a ladder, and then follow these steps:
- Locate the force control screws, which are typically on the back of the garage door opener.
- Insert the screwdriver into the screw labelled Open Force and turn it slightly higher, following the diagram that is with it.
- Most garage doors can be opened at around a setting of 3-4.
- Try closing the garage door again to see if it works.
Hopefully, that should fix the issue. If not, you can keep slowly increasing the open force until the motor is providing enough force to push the door down.
You may also want to go inside the garage and make sure that the door latch is attached to the chain running along the ceiling. This can sometimes become detached and the door will remain closed even if the motor is running.
LiftMaster Remote Won’t Program
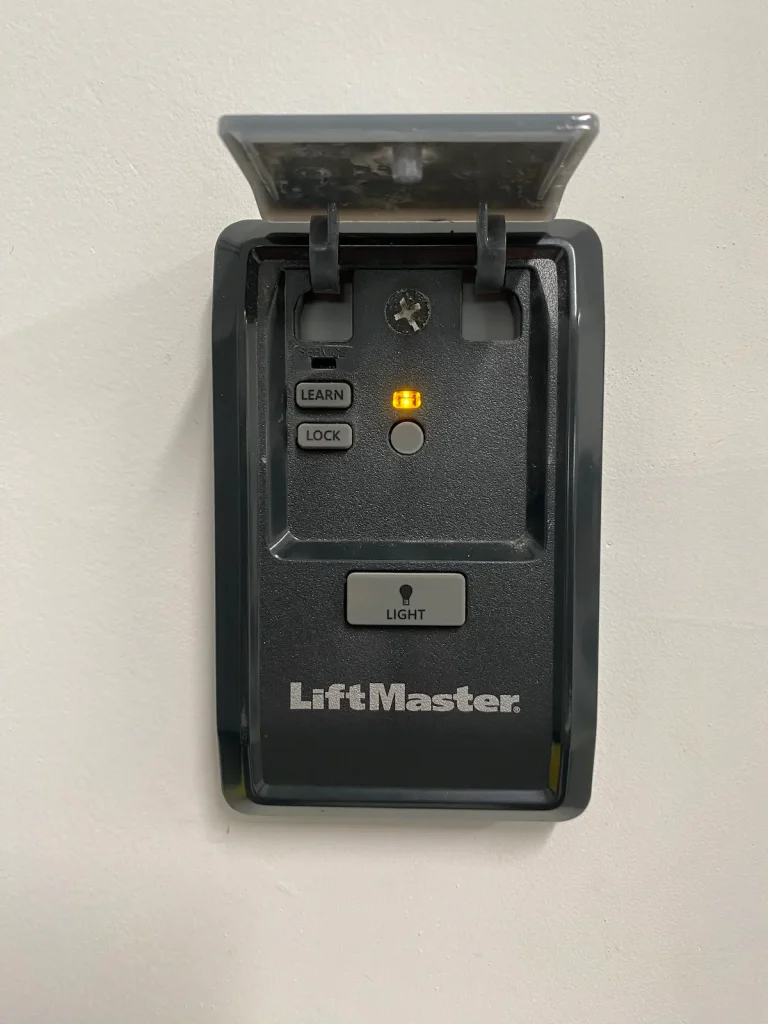
If the remote to your LiftMaster garage door opener isn’t working and won’t program, you may need to reset your system first.
The easiest way to do that is from the door control.
Open the cover and press the learn button for about 6 seconds or until the LED light turns off. This will erase all previous codes so that your LiftMaster remote can be programmed.
To reprogram your remote to pair it back with the same garage door opener, follow these steps:
- Press the Learn button once—don’t hold it down.
- Press the Learn button again.
- On your remote, select the button that you want to control the garage door opener.
- Press and hold that button down until you see the garage door opener lights blink or you hear two clicks.
- Press the button one more time to test it and make sure it’s paired.
If you don’t have a door control or it doesn’t have a working Learn button, you can also reset from the garage door opener itself. It’s also possible to reset your LiftMaster keypad with this method, even if you don’t remember the PIN code.
LiftMaster MyQ Won’t Connect To WiFi
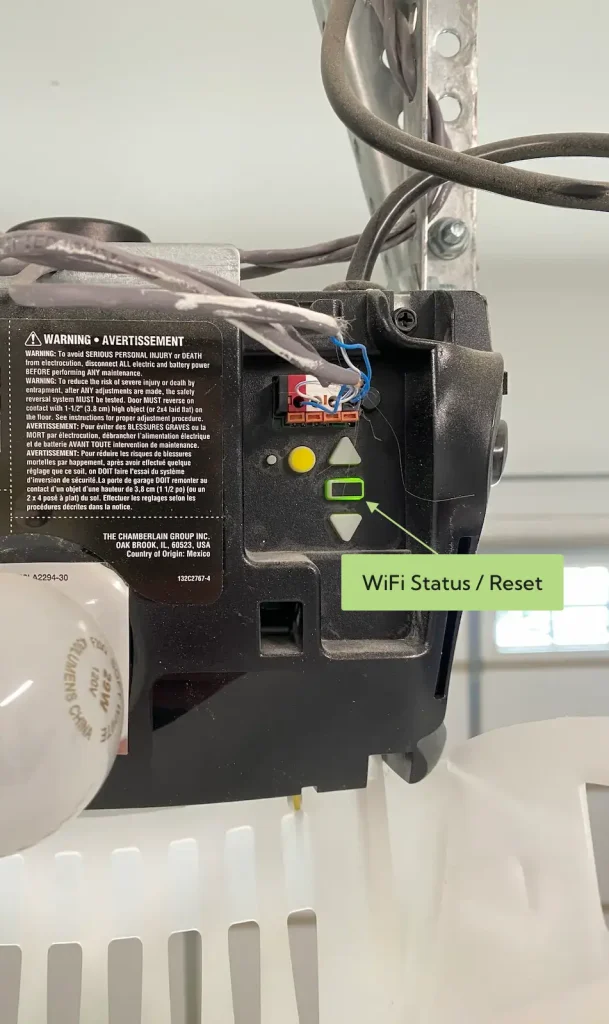
If you’ve recently changed your network settings or installed a new router, you may have some trouble getting the LiftMaster to reconnect to your WiFi network.
You can check the status of your garage door opener’s WiFi connection by accessing the controls on the back of the opener. If the square light is green, it means that it’s connected to WiFi.
If it’s flashing, it’s not connected or having problems connecting.
You can easily fix any WiFi connection issues by resetting the WiFi settings.
- Press the rectangular button and hold it for about six seconds, or until the flashing light stops.
- Open the MyQ app and follow the instructions to connect the garage door opener to WiFi.
Hopefully, after resetting your network settings on the garage door opener, you will be able to reconnect it to your WiFi network without any issues.
LiftMaster Light Won’t Turn Off
By default, all LiftMaster garage door opener lights will stay on for 4.5 minutes after being activated.
If the garage door opener light was activated manually from the door control, it will stay on indefinitely. You can turn it off by pressing the light button on the door control.
Another reason for the light to stay on is because you have a door control with a motion sensor that is detecting motion. To deactivate this:
- Press the Menu button on your door control
- Select Light Settings and then select Automatic Light.
- Use the down arrow to select Motion Sensor and then press the button beneath the word Off.
- Press Back and then select Exit to leave the menu.
After selecting Automatic Light, you can also decide if you want the entry sensor to automatically turn the lights on whenever something moves in front of the sensors at the bottom of your garage door.
What You Need To Know
LiftMaster is one of the most trusted and reliable brands when it comes to garage door openers, and they are built to withstand the elements and keep working for years.
That said, there are a few common issues that homeowners typically run into, such as:
- LiftMaster garage door won’t close
- LiftMaster garage door won’t stay closed
- LiftMaster garage door won’t open
- LiftMaster remote won’t program
- LiftMaster MyQ won’t connect to WiFi
- LiftMaster light won’t turn off
Fortunately, most of these issues are relatively minor and can be fixed at home with simple tools. If you’re still running into problems, you can reach out to LiftMaster support through live chat or by phone.

